
I often am asked do I have any tips for making a naked cake. As an avid baker of all kinds of cake these are my absolute favourite kind of cake to make and with fresh fruit or flowers they can be a spectacular centre piece at any celebration. They are quite simple to make but do have pitfalls, they can end up looking wonky and, particularly with a wedding cake that needs to stand out for a long time, can dry out making the cake really unpleasant to eat by the time you get to eat it.


So the first tip is how to bake an even cake. My favourite recipe for a vanilla or lemon cake is Classic Birthday Madeira by She Who Bakes. I’m a bit old fashioned so I tend to cream the butter and sugar, add eggs slowly then gently fold in the flour instead of the all in one method she uses but I always follow her proportions. I like to bake one deep cake and split it rather that several individual layers, this means you have fewer risen tops to contend with and the edges of the cake are all in line with each other adding to a more uniform finish. For an 8 inch tin (3.5inch deep) I use 7 egg mixture and for the 6 inch tin (3inch deep) I use 4 eggs.
Firstly always grease and line the tin with non stick baking parchment. This makes sure you get all the cake out and it has a nice even form. Go to the trouble of cutting out a circle for the base and strips for the edges to prevent creases in the edges of the cake.
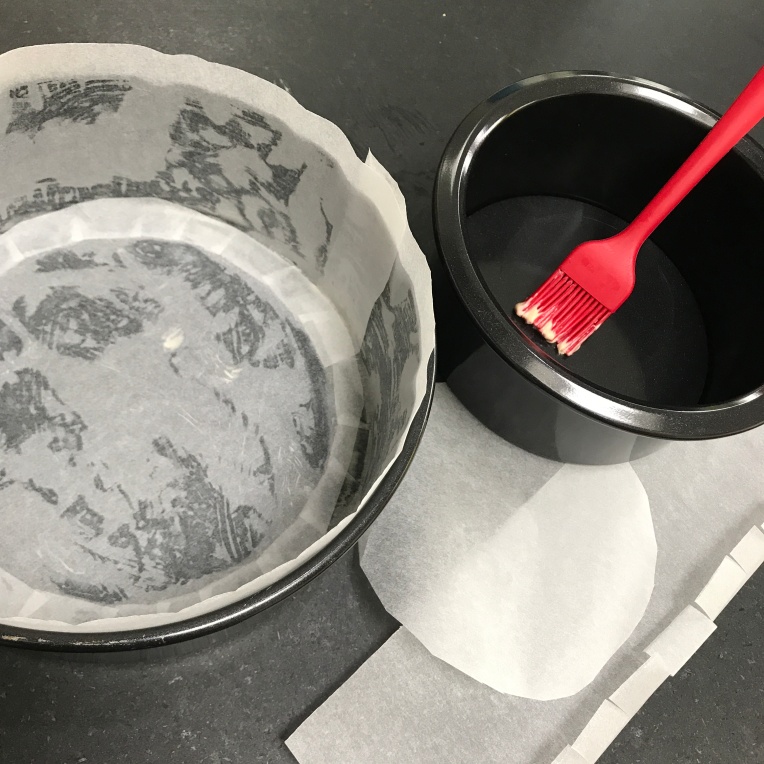
So how so do you bake a cake that rises evenly? She Who Bakes has some great tips like a long low bake. I also place a dish of water in the base of the oven, the steam helps stop the tin get too hot which cooks the edges first and pushes the centre up and gives that unwanted dome in the middle of the cake.

Finally on tin prep I use a damp strip of towel pinned around the outside of the tin, which further helps keep the tin temperature down in the early stages. Once your mixture is in the tin give it a sharp rap on the worktop to get rid of any big air bubbles.

My 8 inch cake takes a good 1hr45mins and the 6 inch about 1hr30mins but its well worth the wait! You can see where I have tested my cake several times! You need to cool the cakes the right way up – I would normally invert my cakes and use the base as the top for a covered cake but naked cake should be the right way up – hope that makes sense. If you do get a bit more rise or a crack on the top don’t panic! Allow to cool for a short while upside down on a tea towel on the cooling rack this will help even out the top, but then turn over after about half an hour.

I made lemon cakes this time so onto my next step which is to make a simple sugar syrup. Equal parts water (or lemon juice in this case) to sugar, dissolve and bring to the boil. If you are doing a vanilla sponge add a teaspoon of vanilla extract to the syrup once boiled. I used 4 lemons (about 100ml of liquid) for two tiers. Allow to cool.

So thats day one done, ideally you need to let the cakes cool completely and sit over night as they cut much better the next day.
Onto splitting the cake, its important to have an evenly split cake as this is all on show and looks much more professional if the layers are even and equal.
Firstly measure your cake height and work out how deep each layer needs to be. Then mark with cocktail sticks where each layer needs to be.

I have a cake splitter tool but if you don’t you can use the cocktail stick method, this video I made a while back shows you how.

When you have split all the layers keeping the cake together mark a straight line with cocktail sticks down the cake. This will help later to realign the cake so it goes back in the same place it started.

Lay all the layers out and brush each one with the syrup.


You also need to clear a space in your fridge or freezer for the next step. Its important to get even layers that don’t collapse on each other and firming the buttercream helps do this.
Place the base layer onto a cake card the same size as the cake, sticking them together with a light scraping of buttercream. Using a disposable piping bag with a 1 cm hole cut in the bottom pipe and even layer of buttercream on the base of the first layer. Then smooth it out gently, taking the buttercream to the edges.


In the meantime I spread a layer of the lemon curd on the other side of the next layer.

Once the buttercream has set place the next layer on top lining up those cocktail sticks. Make sure the cake is lined up vertically and repeat the buttercream process. Finally add the top layer again make sure the cake is level vertical and horizontally. A spirit level and set square are your friends here!

Next step is to brush all over the stacked cake with the syrup again.

You can now take out the cocktail sticks – their job is done!. If you are going for a naked cake you are almost there but its the final touches that help. Pop a 1/2 centimetre straight nozzle in a bag and pipe round the cake filling in those little gaps. You will be surprised at how much better the cake looks.

You are now ready for stacking. I made this weeks cake in a semi naked style. The advantage of this is that it helps keep the cake moist and give a little more scope to stick on flowers and hide an imperfections however if you want to stick with naked and good twitter pal suggested Snow Sugar by Bakery Bits recently which will apparently not dissolve as quickly as ordinary icing sugar and gives a lovely dusting. I have yet to test it myself but trust her judgement, thank you @The_Cakery47.
To get the semi naked finish using a pallet knife ‘paddle’ on a thin layer of buttercream onto the sides of the cake. It’s worth thinning the buttercream slightly with some boiled water at this point as it will smooth out more easily

I then use a set square to scrape round the edges this helps show where the cake isn’t quite straight, the beauty of the semi naked style is that you want some cake to show and some to be hidden but still need a straight cake. I also use my metal smoother just to get a nice finish.

Once your edges are straight do the top, you want a flat top. But don’t forget this a rustic style it doesn’t need to be perfect.

Chill the cakes again in preparation for the next stage.
So onto stacking. I use jumbo straws to stack my cakes, they seem to be plenty strong enough to support up to 3 tiers and are easy to cut. Firstly mark out the position of the next tier with a spare cake card. Then insert on straw to get the correct height. Finally use that as a template to get all the other straws the same length.


Keeping checking the levels at every stage a flat top will help keep the overall cake on track and give a final professional finished look.
I like to put even my naked cakes on to a covered cake drum, although I do also have a lovely choice of natural wooden boards which work really well. This one was finished with a cream coloured fondant paste to match the buttercream and a silver ribbon to go with the finished design. Mark the cake position with a cake card the same size as your base layer and place the cake on the board, a little buttercream will secure the cake if the fondant is very dry.

Pop the next tier on top and check the levels again! Finally you need to hide the cake cards. I used a little of the buttercream topic ‘pearls’ round the cake but you could use a single fine line of buttercream or a ribbon if you prefer.

You are now done all ready for any final decoration flourishes you might like!

This weeks cake used a variety of decoration but the star of the show is edible organic flowers by Maddocks Farm Organics. I also added a few dried petals, a few sprigs of thyme, some buttercream rosettes, some edible jewels and a sugar paste number and ‘fabulous’ bopper to link in with the birthday party style of pink and silver with added glamour!


Absolutely lovely and some very sound advice! Thanks for sharing. Lxxx
LikeLiked by 1 person
Thank you always happy to pass on what I have picked up along the way
LikeLike
Hi , I’ve just found your wonderful tutorial just in time. Such good advice. Please could you tell me if I could use white chocolate ganache or white chocolate buttercream for a semi naked coating. I have to make a cake for my niece 2 days ahead and transport it 200 miles. It will have to sit overnight and be stacked at the venue. She will be using the cake with berries for dessert. I feel I need a coating which will dry with a firmer texture than just ordinary buttercream. I am very much a mum baker making cakes for tea. This will test me . Thank you for any advice you may have
LikeLiked by 1 person
Hi Roberta thanks for your kind comments – semi naked cakes can dry out quite quickly so having to make a couple of days in advance may result in a slightly dryer cake. A white ganache coating will help seal your cake but in order to create that just covered look of a semi naked cake I suggest you brush it on whilst still quite warm then smooth with a warms metal palette knife. I also suggest you brush the cakes with a vanilla sugar syrup first before you coat it to retain the moisture in the cake.
Good luck with your cake I’m sure you will do a wonderful job
Becky
LikeLike
Thank you. Will try this on a test cake
LikeLiked by 1 person
hallo i am from south africa and dont know if you would be able to help me i baked this recipe today 6″ round cake 3″high pan i baked it for 1 hour 40 min it was still very raw in the middle what could have gone wrong 140 degrees oven and a bowl of water and the towel around the pan but still soggy at the bottom in the middle any advice please
LikeLiked by 1 person
Hi Sorry to hear that, is your oven calibrated in Celsius or Fahrenheit? This should be 140C the water is at the base of the oven not around the cake ? The towel should only be damp not wet – Have you got an oven thermometer to check your oven temperature?
It’s hard to say exactly where it went wrong without seeing what you have done – I hope the tips help
LikeLike